快速搭建网站
vitepress
vitepress,VitePress 是一个静态网站生成器(SSG),专为构建快速、以内容为中心的网站而设计。简而言之,VitePress 获取您用Markdown编写的源内容,对其应用主题,并生成可以轻松部署到任何地方的静态 HTML 页面。
适用于开发文档、博客等
vitepress 模板
在线示例:查看
仓库地址:new-vitepress-demo - SuYxh - github
实用 markdown 扩展
参考: markdown-extensions - vitepress
INFO
This is an info box.
TIP
This is a tip.
WARNING
This is a warning.
DANGER
This is a dangerous warning.
Details
This is a details block.
::: info
This is an info box.
:::

::: tip
This is a tip.
:::

::: warning
This is a warning.
:::

::: danger
This is a dangerous warning.
:::

::: details
This is a details block.
:::
::: info
This is an info box.
:::
::: tip
This is a tip.
:::
::: warning
This is a warning.
:::
::: danger
This is a dangerous warning.
:::
::: details
This is a details block.
:::custom title
STOP
Danger zone, do not proceed
Click me to view the code
console.log('Hello, VitePress!')console.log('Hello, VitePress!')::: danger STOP
Danger zone, do not proceed
:::
::: details Click me to view the code
# ```js
console.log('Hello, VitePress!')
# ```
:::::: danger STOP
Danger zone, do not proceed
:::
::: details Click me to view the code
# ```js
console.log('Hello, VitePress!')
# ```
:::图片放大/图片预览
使用 vitepress-plugin-image-viewer 插件
点击下图,查看效果

安装使用
安装依赖
npm i vitepress-plugin-image-viewer --save
npm i sass --save
npm i vitepress-plugin-image-viewer --save
npm i sass --save引入下面的代码后,markdown 文档中的图片会自动加上预览功能。
// .vitepress\theme\index.ts
import Theme from "vitepress/theme";
import "./style/var.css";

// 图片放大/预览
import "viewerjs/dist/viewer.min.css";
import imageViewer from "vitepress-plugin-image-viewer";
import vImageViewer from "vitepress-plugin-image-viewer/lib/vImageViewer.vue";
import { useRoute } from "vitepress";

export default {
  ...Theme,
  enhanceApp({ app }) {
    // 注册全局组件,如果你不想使用也可以不添加
    app.component("vImageViewer", vImageViewer);
  },
  setup() {
    // 获取路由
    const route = useRoute();
    // 使用
    imageViewer(route);
  },
};
// .vitepress\theme\index.ts
import Theme from "vitepress/theme";
import "./style/var.css";
// 图片放大/预览
import "viewerjs/dist/viewer.min.css";
import imageViewer from "vitepress-plugin-image-viewer";
import vImageViewer from "vitepress-plugin-image-viewer/lib/vImageViewer.vue";
import { useRoute } from "vitepress";
export default {
...Theme,
enhanceApp({ app }) {
// 注册全局组件,如果你不想使用也可以不添加
app.component("vImageViewer", vImageViewer);
},
setup() {
// 获取路由
const route = useRoute();
// 使用
imageViewer(route);
},
};用户体验
为了更好的用户体验,可以增加鼠标移动到图片时,变成放大镜的效果,css 如下
/* .vitepress\theme\style\var.css */
.main img {
  cursor: zoom-in; /* 移动到图片上,可放大 */
}
/* .vitepress\theme\style\var.css */
.main img {
cursor: zoom-in; /* 移动到图片上,可放大 */
}点击按钮打开图片
另外该插件还内置了点击按钮,查看图片的功能组件 vImageViewer
代码如下:
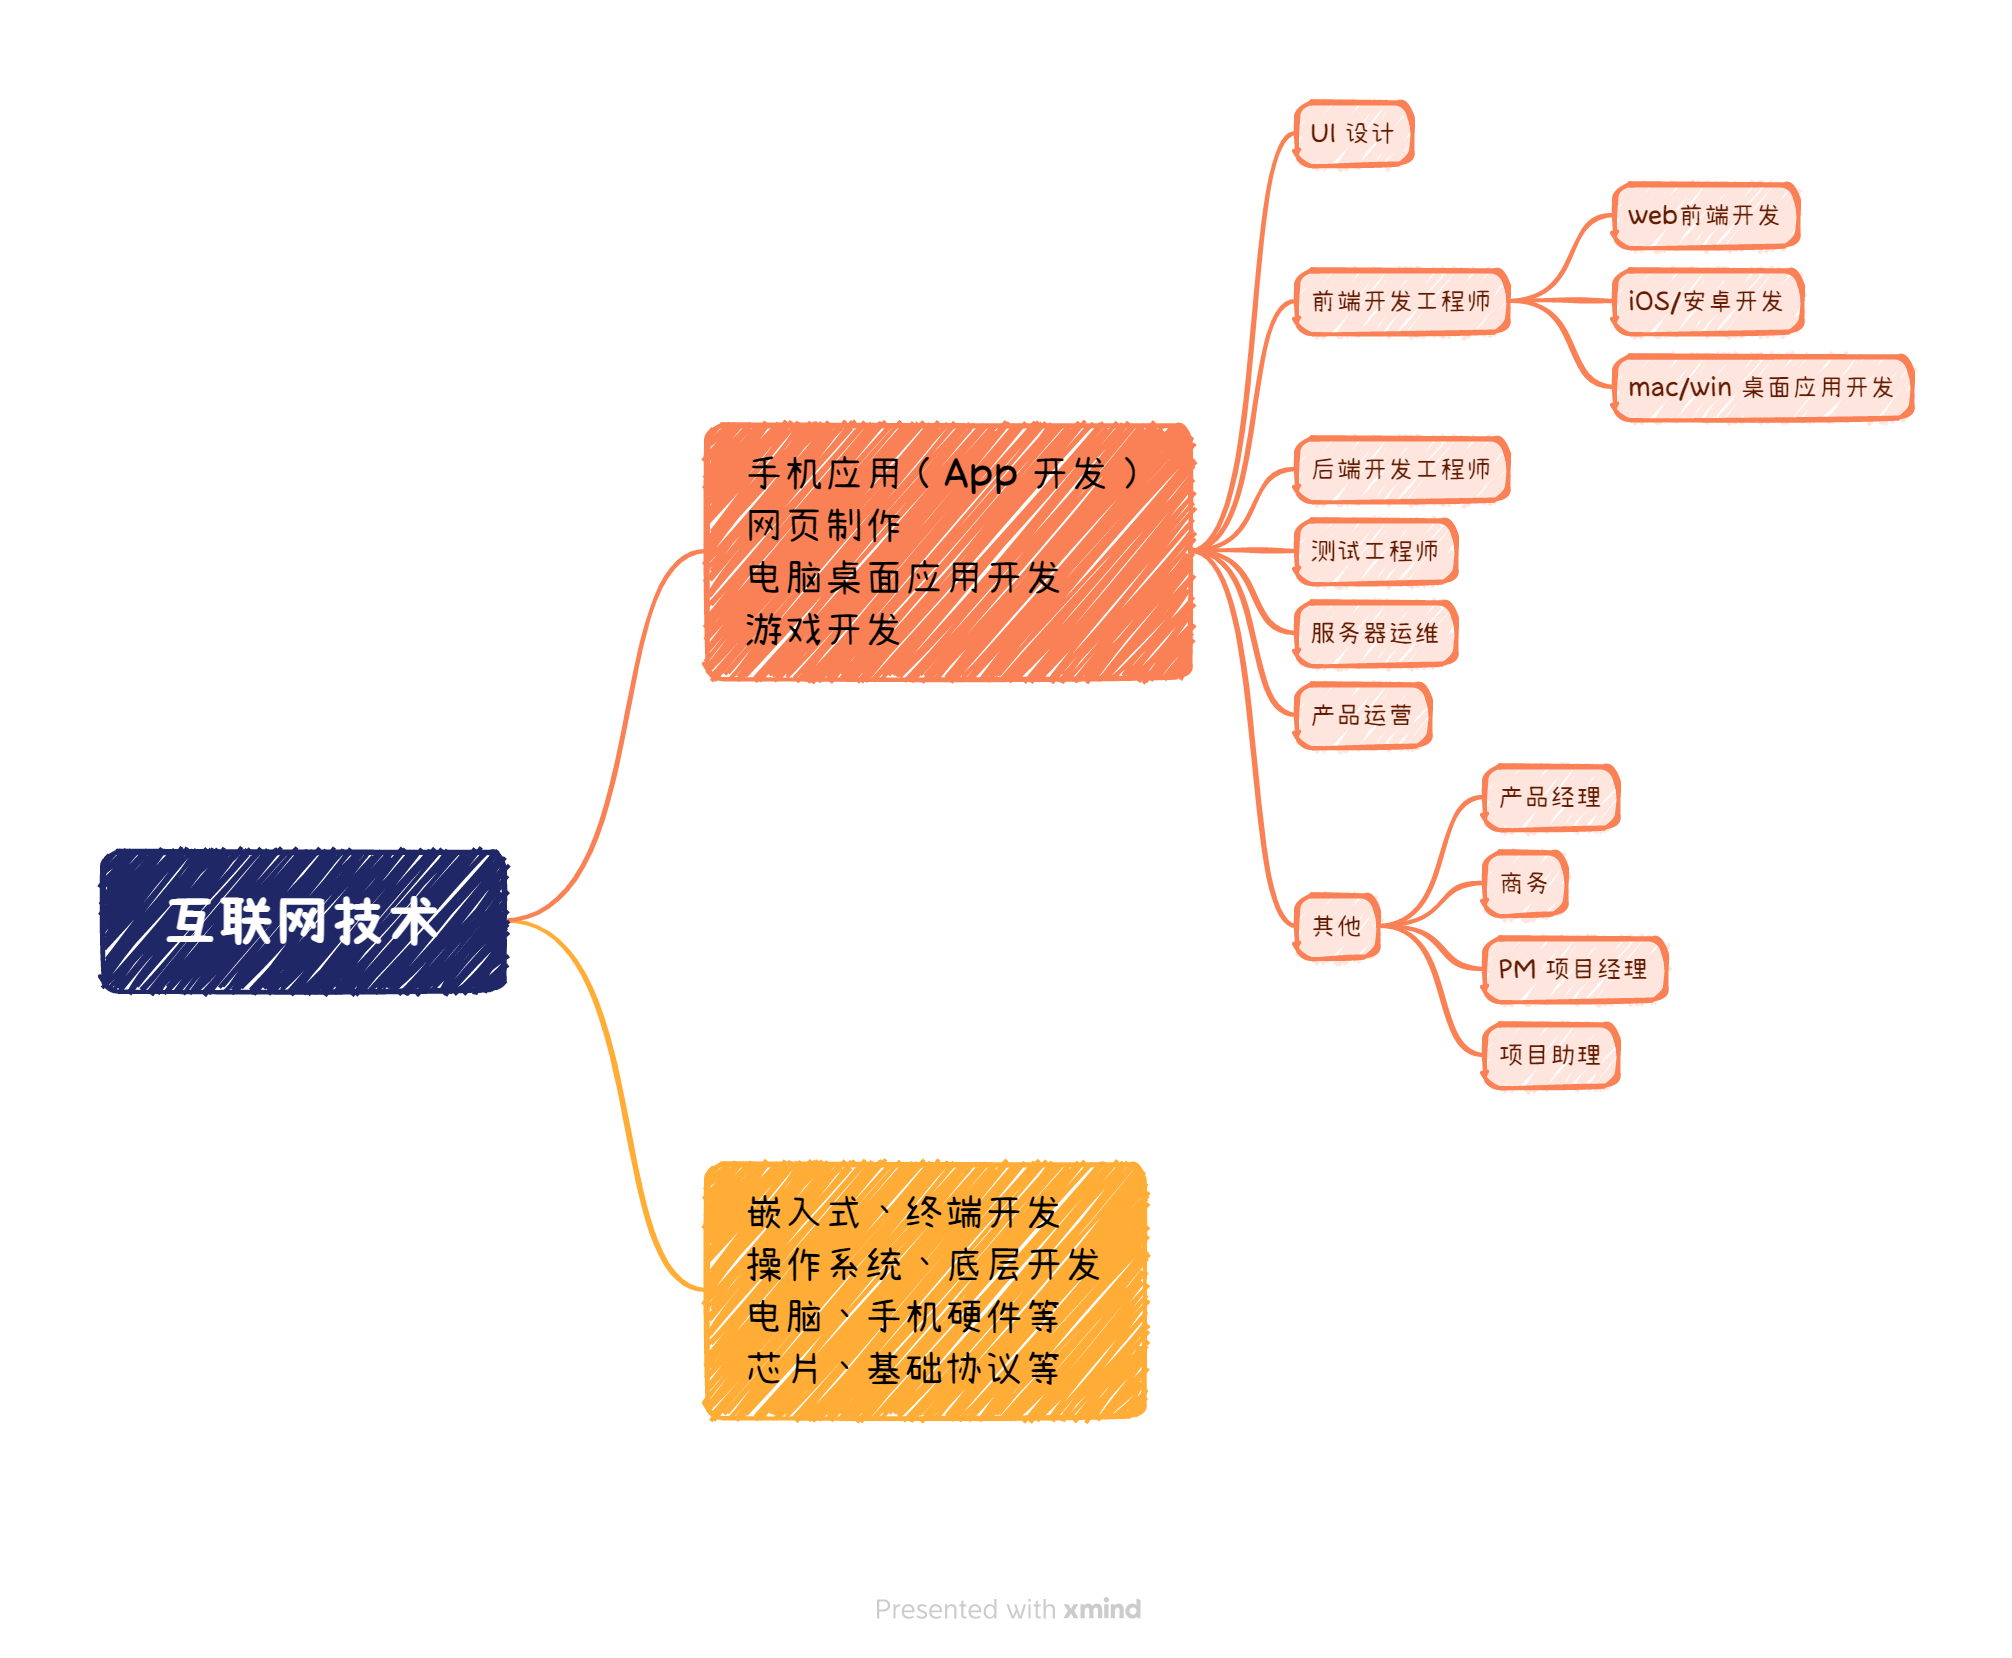
<vImageViewer src="/images/互联网技术.png" alt="点击按钮查看图片" :inline="false"/><vImageViewer src="/images/互联网技术.png" alt="点击按钮查看图片" :inline="false"/>其中,inline 属性设置为 true,那么它会变成一个行内元素,他不是必需的,默认为 false
评论系统
使用 valine 提供的评论功能
注册 valine
1、根据官网,先去注册 LeanCloud
2、按照说明文档,一步步操作,创建一个应用,然后获取到 APP ID 和 APP Key
将 Valine.min.js - cdn 文件放到 public/js/ 目录下,因为用 npm 包在 build 时会出现 ReferenceError: window is not defined 错误,需要通过 cdn/js 引入
每篇文章底部添加评论
使用 doc-after 插槽在每篇文章中增加评论组件
<!-- .vitepress\theme\MyLayout.vue -->
<script setup>
import DefaultTheme from 'vitepress/theme'
import ValineComment from './ValineComment.vue';
const { Layout } = DefaultTheme
</script>

<template>
  <Layout>
    <template #doc-after>
      <ValineComment />
    </template>
  </Layout>
</template>
<!-- .vitepress\theme\MyLayout.vue -->
<script setup>
import DefaultTheme from 'vitepress/theme'
import ValineComment from './ValineComment.vue';
const { Layout } = DefaultTheme
</script>
<template>
<Layout>
<template #doc-after>
<ValineComment />
</template>
</Layout>
</template>修改主题布局入口文件
// .vitepress\theme\index.ts
import Theme from "vitepress/theme";
import MyLayout from './MyLayout.vue'
import "./style/var.css";

export default {
  ...Theme,
  // override the Layout with a wrapper component that injects the slots
  Layout: MyLayout,
};
// .vitepress\theme\index.ts
import Theme from "vitepress/theme";
import MyLayout from './MyLayout.vue'
import "./style/var.css";
export default {
...Theme,
// override the Layout with a wrapper component that injects the slots
Layout: MyLayout,
};评论组件代码,包含评论、阅读量显示
<!-- .vitepress\theme\ValineComment.vue -->
<template>
  <div class="comment-wrap">
    <!-- 阅读量 -->
    <div class="page-edit-read">
      <span class="leancloud-visitors" data-flag-title="dev-zuo">
        <span class="post-meta-item-text">阅读量: </span>
        <i class="leancloud-visitors-count"></i>
      </span>
    </div>
    <div id="vcomments"></div>
  </div>
</template>

<script setup>
import { onMounted, watch } from "vue";
import { useRoute } from "vitepress";
// import Valine from "valine";

const route = useRoute();

onMounted(() => {
  remoteImport("/js/Valine.min.js").then(() => initValine());
  // remoteImport('//unpkg.com/valine/dist/Valine.min.js').then(() => initValine());
});

watch(
  () => route.path,
  () => {
    console.log("监听路由变化");
    initValine();
  }
);

function initValine() {
  // 为防止本地调试访问量干扰线上数据,本地使用前缀,线上使用相对路径
  let isLocalDebug = ['http://localhost', 'http://127.0.0.1'].some(item => location.origin.startsWith(item))
  let path = isLocalDebug ? `${location.origin}${location.pathname}` : location.pathname;

  document.getElementsByClassName("leancloud-visitors")[0].id = path;
  new Valine({
    el: "#vcomments",
    appId: "xxx", // your appId
    appKey: "xx", // your appKey
    notify: false,
    verify: false,
    path: path, // window.location.pathname (默认值,推荐)
    visitor: true,
    avatar: "identicon",
    placeholder:
      "请在这里留下你的留言,如果上面填写了邮箱还能收到邮件哟,地址是点击头像跳转的地址",
    // other config
  });
}
// path
// I. 请保证每个文章页路径的唯一性,否则可能会出现不同文章页下加载相同评论列表的情况。
// II. 如果值为window.location.href,可能会出现随便加不同参数进入该页面,而被判断成新页面的情况。

function remoteImport(url) {
  return new Promise((resolve) => {
    var head = document.getElementsByTagName("head")[0];
    var script = document.createElement("script");
    script.setAttribute("type", "text/javascript");
    script.setAttribute("src", url);
    head.appendChild(script);

    script.onload = function () {
      resolve();
    };
  });
}
</script>

<style lang="scss">
.comment-wrap {
  margin-top: 20px;
  .page-edit-read {
    margin: 12px;
    text-align: right;
  }
}
</style>
<!-- .vitepress\theme\ValineComment.vue -->
<template>
<div class="comment-wrap">
<!-- 阅读量 -->
<div class="page-edit-read">
<span class="leancloud-visitors" data-flag-title="dev-zuo">
<span class="post-meta-item-text">阅读量: </span>
<i class="leancloud-visitors-count"></i>
</span>
</div>
<div id="vcomments"></div>
</div>
</template>
<script setup>
import { onMounted, watch } from "vue";
import { useRoute } from "vitepress";
// import Valine from "valine";
const route = useRoute();
onMounted(() => {
remoteImport("/js/Valine.min.js").then(() => initValine());
// remoteImport('//unpkg.com/valine/dist/Valine.min.js').then(() => initValine());
});
watch(
() => route.path,
() => {
console.log("监听路由变化");
initValine();
}
);
function initValine() {
// 为防止本地调试访问量干扰线上数据,本地使用前缀,线上使用相对路径
let isLocalDebug = ['http://localhost', 'http://127.0.0.1'].some(item => location.origin.startsWith(item))
let path = isLocalDebug ? `${location.origin}${location.pathname}` : location.pathname;
document.getElementsByClassName("leancloud-visitors")[0].id = path;
new Valine({
el: "#vcomments",
appId: "xxx", // your appId
appKey: "xx", // your appKey
notify: false,
verify: false,
path: path, // window.location.pathname (默认值,推荐)
visitor: true,
avatar: "identicon",
placeholder:
"请在这里留下你的留言,如果上面填写了邮箱还能收到邮件哟,地址是点击头像跳转的地址",
// other config
});
}
// path
// I. 请保证每个文章页路径的唯一性,否则可能会出现不同文章页下加载相同评论列表的情况。
// II. 如果值为window.location.href,可能会出现随便加不同参数进入该页面,而被判断成新页面的情况。
function remoteImport(url) {
return new Promise((resolve) => {
var head = document.getElementsByTagName("head")[0];
var script = document.createElement("script");
script.setAttribute("type", "text/javascript");
script.setAttribute("src", url);
head.appendChild(script);
script.onload = function () {
resolve();
};
});
}
</script>
<style lang="scss">
.comment-wrap {
margin-top: 20px;
.page-edit-read {
margin: 12px;
text-align: right;
}
}
</style>全文搜索
vitepress 如何开启 algolia 全文搜索 - YvanZhu
- 1、申请 docsearch.algolia.com/apply/
- 2、收到邮件后回复 Thanks!
- 3、再次收到邮件(包含 appId、appKey)
- 4、配置
.vitepress/config.ts
export default defineConfig({
  // ...
  themeConfig: {
    // ...
    algolia: {
      appId: "xx",
      apiKey: "xxxxx",
      indexName: "xxx"
    },
  }
})
export default defineConfig({
// ...
themeConfig: {
// ...
algolia: {
appId: "xx",
apiKey: "xxxxx",
indexName: "xxx"
},
}
})内容更新后怎么触发 algolia 重新爬取内容
在首次申请时,algolia 会第一次爬取内容。但由于我是私有仓库
内容更新后,algolia 无感知,怎么手动触发内容更新呢?
登录 https://www.algolia.com/ ,我用的是 github 登录方式,邮箱与我之前申请时使用的一致,会自动关联 index,直接进入对应管理页面
点击左下角 Data Sources => Crawler /ˈkrɔːlə(r)/ 进入管理页面 https://crawler.algolia.com/admin/crawlers 点击 Restart crawling 重新抓取,即可更新内容